Draw-SVG
user's guide
Draw-SVG
user's guide
Draw-SVG
user's guide
Draw-SVG
user's guide
This tool is used to edit an image which shows a google map.
The map editor display a Google map dialog panel for searching a place and browsing the map.
See also draw map showcase for an interactive demonstration of how to insert and edit a Google Map in your SVG drawing..
![]() The filter points editor can be applyed to polylines, polygons and paths to remove unnecessary points of the selected element.
The filter points editor can be applyed to polylines, polygons and paths to remove unnecessary points of the selected element.
The tool is displayed as a svg panel inside the document.
The filter is defined by a corridor of a given radius to fix the points of the rope line and delete those whose distance to the rope line is less than the radius.
The panel has a slider to set the filter radius in pixels and a radio button to set the position of the rope line when the corridor includes one or more points in three ways (Middle, Min, Max):
Middle position (default). The rope line connects each end of the corridor and excludes all included points.
Min position. The rope line passes through the point of lowest height h, this reduces the area of the polygon if it is described clockwise.
Max position. The rope passes through the point of greatest height h, this increases the area of the polygon if described clockwise.
To make the filter logic more visual and understandable:
The filter is drawn in transparency with a circle on each point of the rope line and its corridor to show the filtered points.
The rope line is drawn in brown color.
The panel displays the number of points removed and its percentage.
The curve segments of the path elements are replaced by straight line segments
See filter points showcase.
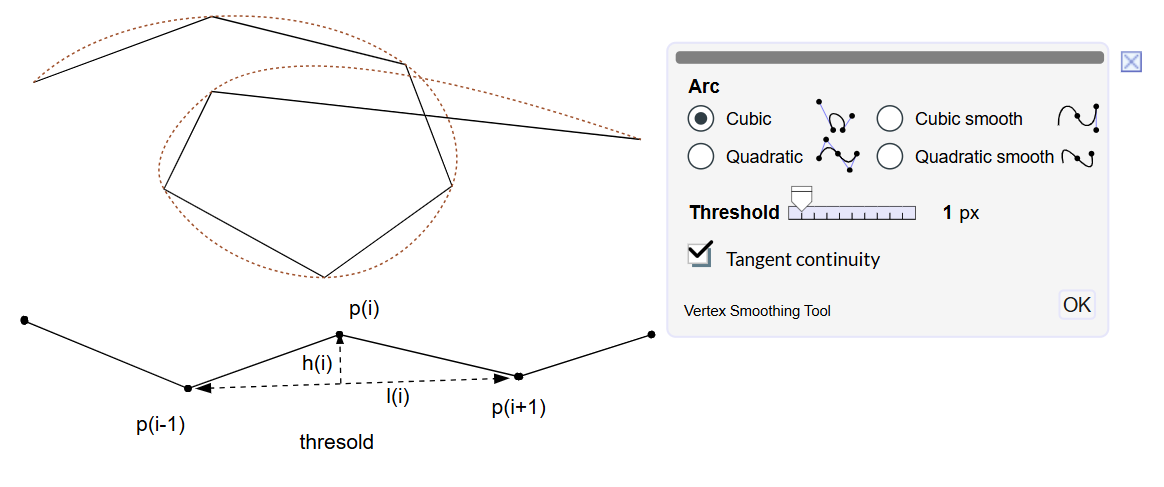
![]() Smoothing the vertices of a polyline, polygon or path.
Smoothing the vertices of a polyline, polygon or path.
The tool is displayed as a svg panel inside the document.
The curve is smoothed with Bézier arcs of degree 3 or 2 (cubic, smooth cubic, quadratic, smooth quadratic).
The panel consists of:
A radio button to select the arc type (cubic, cubic smooth, quadratic, quadratic smooth)
A slider to define the threshold distance
A checkbox for continuity of tangents of cubic arcs
The threshold distance sets the two smoothing conditions for a vertex p(i) as follows:
the height h(i) must be greater than the threshold
the length l(i) of the line (i-1,i+1) must be greater than twice the threshold
The smoothed curve is plotted in brown dotted lines. It is advisable to first remove redundant points using the filter points function.
Polylines and polygons are replaced by paths.
See smooth vertices showcase.
The offset attribute of a textPath defines the curvilinear abscissa of the text on the associated path .
The offset can be adjusted with the slider of the editor's svg panel, or entered directly into the field.
The tool is displayed as a svg panel inside the document.
See also drawing text on a path showcase for an interactive demonstration.
This tool is used to customize the gradient of a shape
To prevent modification of the shared gradient definition, make a copy or an extension of the gradient,
Then define the transformation with the rotation angle and the scale factor
Apply the transformation or close the panel without modification.
Customization by extension has the advantage of minimizing the volume and continue to benefit from changes made to the basic gradient.
See also creating , using gradients showcases for interactive demonstrations.
This tool is used to customize the pattern of a shape
To prevent modification of the shared pattern definition, make a copy or an extension of the pattern,
Then define the transformation with the rotation angle and the scale factor
Apply the transformation or close the panel without modification.
Customization by extension has the advantage of minimizing the volume and continue to benefit from changes made to the basic pattern.
See creating , using patterns showcases for interactive demonstrations.
This panel loads an image file, then encode it's content as a dataURI to set the href attribute of the selected image element :
Select the image resolution to optimize the encoded size based on the expected rendering quality.
Click the Apply button to set the href attribute of the selected image element.
See also draw image showcase for an interactive demonstration of how to draw an image.
It's also possible to load a svg file by this way.
But in this case the most suitable method is to use the element svg included for the following reasons:
The vector display renders the document with its original resolution and quality.
The content of the included svg is editable.
The editor asks for confirmation to avoid confusion and to learn about the alternative use.
 |
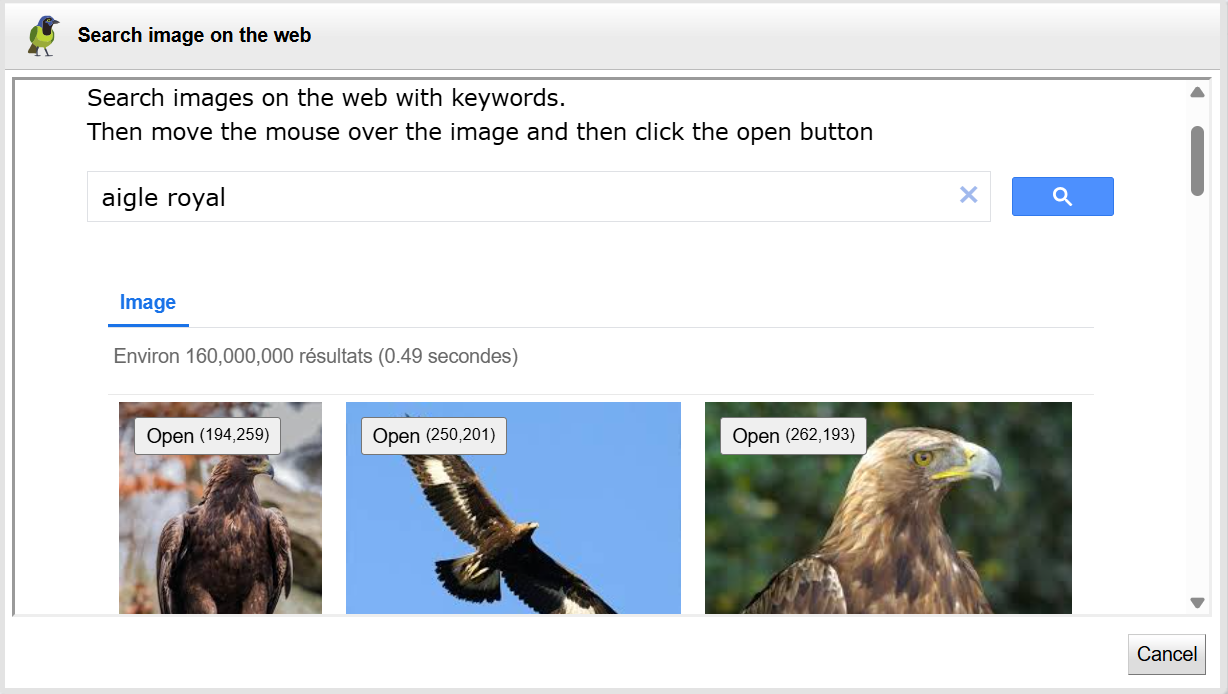
This panel integrates Google's image search function on the WEB.
Enter your keywords, then click the search button to view matching images:
For a mouse-enabled screen, hover over the images to display the upload button, then click the upload button for the desired image.
For a touch screen without a mouse, click on the images to bring up the load button, then click the load button of the desired image.
This panel loads the HTTP URL referenced by the selected image element, then encode it's content as a dataURI to set its href attribute :
Select the image resolution to optimize the encoded size based on the expected rendering quality.
Click the OK button to set the href attribute of the selected image element.
It's also possible to view a svg URL by this way.
For the same reasons detailed previously in image file load , the most suitable method is to use the element svg included.
The URL is downloaded via a proxy for safety reasons. The URL must be accessible from the server.
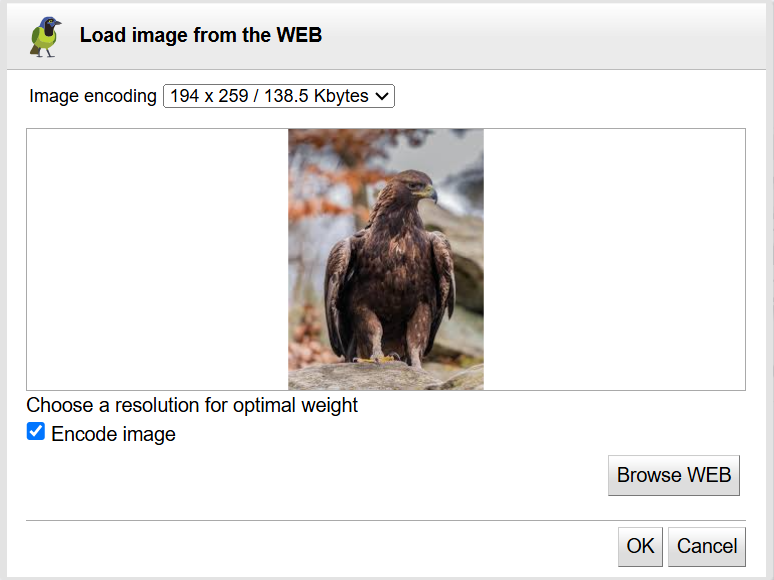
This panel loads an image searched on the WEB, encodes its content as a dataURI to set the href attribute of the selected image element :
Select the image resolution to optimize the encoded size based on the expected rendering quality.
Uncheck the encoding option to reference the image by its URL.
Click the Browse button to search for another image.
Click the OK button to set the href attribute of the selected image element.
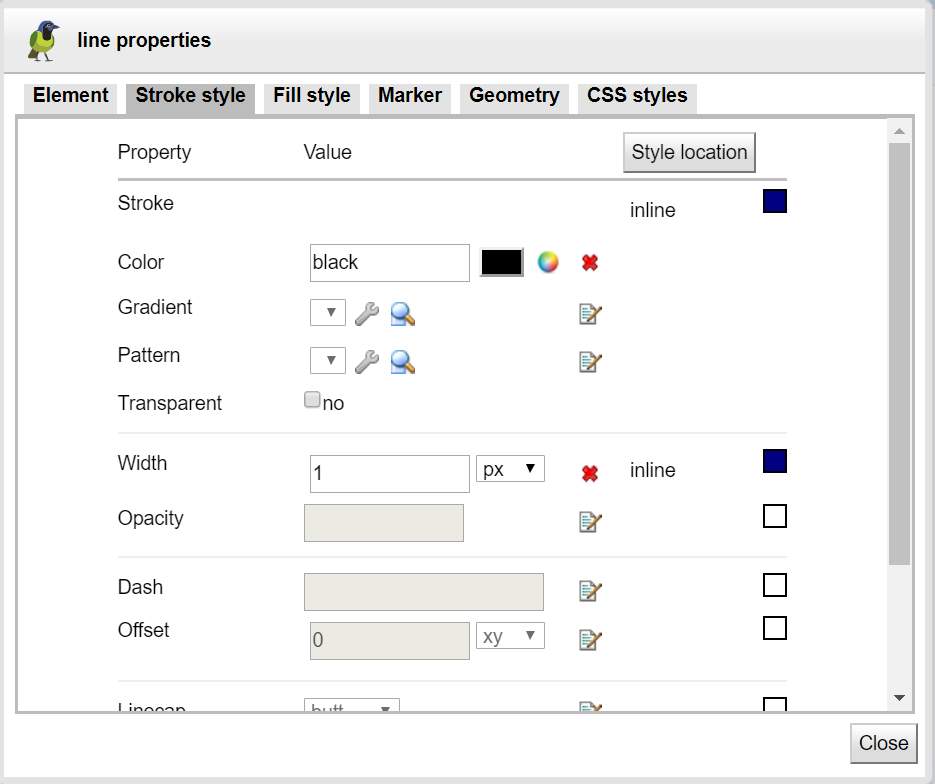
This editing task allows you to edit all properties of the selected item which are supported by Draw-SVG.
Properties are organized into tabs :
Element
Stroke style
Fill style
Marker style
Geometry
CSS styles
Each property is followed by an icon to edit its value
![]() or to delete it
or to delete it
![]() .
.
See also showcase using css styles
Table 4.3. Properties tab element panel
| Tab element | Properties | |
|---|---|---|
|
Element's attributes
|
Table 4.4. Properties tab stroke style panel
| Tab stroke style | Properties | |
|---|---|---|
|
Element's stroke style properties
|
Table 4.7. Properties tab geometry panel
| Tab geometry | Properties | |
|---|---|---|
|
Definition of the geometry of the element. For a path element, shows each command with arguments. See showcase edit geometry |
Table 4.8. Properties CSS styles panel
| Tab CSS | Properties | |
|---|---|---|
|
Define CSS classes, move properties from inline location to classes. See showcase using css styles |